In which I help with the production of Jackass 3D promotional materials

October 28th, 2010
Jackass 3D Shoot-1
The greenscreen shoot. That 16:9 frame at right represents the frame of the video player that’s part of the facebook page. Clamps hold breakaway blocks with tracking markers.

If you have a facebook account, you might 1 enjoy checking out this bit of Jackass 3D promotion that I helped plan and coordinate. It was a pretty complicated greenscreen shoot, put together on an extremely short timeline. The Jackass guys were hilarious and game, and their crew was great (special thanks Tripp and Barry). The creative team at Paramount, Picture Production Company, and the folk at Powster did a bang-up job initiating, commissioning, planning, and putting the whole thing together. It’s nice to see the finished result online and to be able to tell people about it. It is an app, you have to give it access to your entire life, but it’s 2 no more insidious than Farmville 3.
Jackass 3D - Uk On Facebook (30)-1
A small section of a final result, composited live in a web browser.

Also part of the same shoot, this baseball-themed game.

All’s well that ends well eh? Now go see the film. How else are you going to see excrement fly at the camera in 3D? 4

  1. Or you might not. There’s no accounting for taste. ↩︎
  2. As far as I know. ↩︎
  3. And far far less annoying. It also doesn’t spam your friends with every smiling sheep you’ve mulesed or smiling automated milking machine you’ve installed or whatever people do in that Farmville thing whose updates drove me from Facebook. And seriously, what’s better, virtual happy farming, or dudes hitting baseballs into each others’ nuts? The world’s answer to that question can be found in the box office receipts for Jackass 3D. ↩︎
  4. Neither a trip to the zoo, nor the blue Navii “tribal bio-expelled tactical paste” seen in the upcoming director’s cut of Avatar count. ↩︎

XKCD’s economic method of testing the validity of human ideas and beliefs

October 21st, 2010

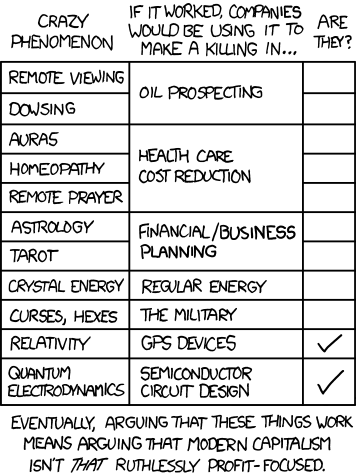
I’m loving this infographic/comic from xkcd:

xkcd comic which posits that modern capitalism's ruthless profit-focus means that it can serve as a litmus test for the validity of many human ideas and beliefs, such as auras, dowsing, and astrology. Those ideas which are used by business to profit would have a data point in their favor.

Found via swisscheeseandbullets.com via themadeshop.tumblr.com. That’s a lot of attributions for one comic whose most direct link is provided above, but they’re worthwhile, as swisscheeseandbullets has a web design I quite like, and themadeshop’s logo becomes a red-cyan anaglyph on mouseover –how cool is that?

Halloween slides into view in a dolly shot

October 20th, 2010

A frame from last night’s camera tests. Noise removed and image sharpened with the NeatVideo plugin.

Activity Monitor-1
15 hours from now, the noise from my Canon T2i’s ISO6400 footage will have been significantly reduced. 15 hours. 15. This is why I need a 12-core computer ASAP.
I stayed up late yesterday with Dmcm - Wikipedia, The Free Encyclopedia 1 testing our new dolly, and for some inexplicable reason most of our camera tests included either pumpkins or skulls. I thought this frame in particular was very pretty.

Like every DSLR shooter with a slider (the non-professional term for a fixed-length dolly) I’m now constantly fighting the urge to post video clips of slow moving shots cut to ambient music. But the internet’s bandwidth is safe for now, as my hands are tied while the NeatVideo FCP plugin takes its sweet time 2 to remove noise and sharpen all the footage.

  1. @dmcm is a person, but I think he should adopt that DMCM molecule diagram as his signature ↩︎
  2. On my quad-core it seems it’ll take 17 hours to do the denoising on 20 minutes of footage. ↩︎

a new set of header images

October 12th, 2010

I moved back to the US of A three years ago, so it’s time to retire my old Beijing-themed header images. I’ll miss the photo of the bicycle-based park barbers and the photo of the bicycle-based couch mover and even the photos of a younger version of myself in front of a red wall, but it’s time for a set that’s new and more relevant to Los Angeles.

So here are the header images I threw together yesterday, along with brief explanations:

New Blog Header Kubrick Wide 3
In Los Angeles it is important to drive everywhere, regardless the distance. Yes, you could walk 3 blocks to your destination, but then you’d miss out on the many routes suggested by your car’s factory-installed GPS system.

New Blog Header Kubrick Wide Studio City Sunset
An average sunset in the hills of LA’s "Studio City" district.

New Blog Header Kubrick Wide 2
The pets of a film editor I know share an "American Gothic" moment. Part of the "A day in the life of Burbank" collection.

New Blog Header Kubrick Wide 6
Disneyland isn’t exactly LA, but it’s close. This picturesque scene is part of the Grand Canyon diorama, one of the many sights to behold while enjoying Disneyland’s charming and ancient train ride.

Due to the extreme horizontal aspect ratio, it’s a challenge to edit images for the header. But it’s fun. The header image displayed per visit is chosen randomly. Once I’ve installed more images, you’ll likely see a different image each visit.

Blog Redesign Phase One

October 11th, 2010
 Mg 0798

This blog has long been overdue for a redesign. I’ve grown tired of rounded corners, sans-serif body fonts, and small photos. It’s high time I made some changes around here.

So welcome to phase one of my blog redesign. Hopefully the text is now more readable, the photos and videos have more room to breathe, and everything looks and feels better, more or less.

Further changes are to come. With phase two, more consistency. Phase 3, refinement. Phase IV, killer ants.

A beforeAfter wordpress plugin

September 30th, 2010
ungraded
graded

What you see above is an example of the beforeAfter jquery plugin in use. If you drag the controls overlaid on the image to the left or right, click anywhere in the image 1, or click the links just below the image, you’ll be able to compare the graded and ungraded looks of a frame from a short film I graded a couple of months ago. 2

beforeAfter was written by admin at catchmyfame.com. You can find the original code, see some demonstration images, and read up on his reasons for developing the plugin in his blog post about beforeAfter.

I was very happy to come across this plugin. I’ve wanted for a while to be able to post before-and-after examples like this to my blog to demonstrate film grading and photo editing work, and this was nearly exactly what I needed. I took the code, wrapped it into a WordPress plugin, and modified it to add a few features. Since I was to benefit from code released freely into the wild by its author, it’s only natural to release the modifications. The beforeAfter wordpress plugin I’ve constructed can be downloaded here:

http://zachfine.com/beforeAfter_wp.tar.gz

I wrote the plugin’s original author to ask for his blessing before releasing this altered version of beforeAfter, and he agreed. Below are excerpts from that email message, which explain my alterations to the code and also contains some instructions on how to use the plugin:

<email message>
On Mon, Jul 19, 2010 at 2:53 PM, Zach wrote:
Hello there,

I was extremely happy to find your jquery beforeAfter script on the net. I’ve wanted for a while to post before and after images to my blog that help show people how to make adjustments to photos or grade video footage, beforeAfter seems like a fantastic way to do that.

I constructed a wordpress plugin based on your script and installed it on my server. It worked very well, but I realized while testing it that the following additional features would be very useful to me (and possibly to others as well):

  • the ability to have an arbitrary number of instances of beforeAfter containers per page
  • the ability to set custom “Show only before” and “Show only after” text strings via custom attribute in the container’s html.
  • the ability to set a custom initial wipe starting point via custom attribute in the container’s html. The reason for this is that I want the beforeAfter controller and its function to be instantly obvious to visitors, so I want to manually place the initial wipe point over the area of greatest between-image contrast — or I might want to place the wipe point over the area I mean to emphasize.

So I read up on javascript and jquery and made a few modifications. It was only after making these modifications that I noticed the script’s license stipulates “No Derivative Works”. I think this means I can’t use the modifications I’ve made unless you give me approval to use my modified version of your script, though I could be wrong. I was planning on sending you these modifications regardless, thinking that in the best-case scenario you might like the modifications and/or make them available to others.

My mods to the script:

Example of container html: 3

<div class="container" data-wipeto="35" data-beforetext="original" data-aftertext="graded" data-animateintro="true" data-introdelay="3000" data-introduration="3000"> <div><img alt="ungraded" src="http://zachfine.com/blog/wp-content/uploads/2010/07/LB-01-00-57-05-original.jpg" height="254" width="450" /></div> <div><img alt="graded" src="http://zachfine.com/blog/wp-content/uploads/2010/07/LB-01-00-57-05-graded.jpg" height="254" width="450" /></div> </div&

Note that I’ve set the user configuration settings above using valid html5 custom attributes. In this manner each container can have its own settings. The html5 spec requires that custom attributes be lowercase and begin with “data-“. Unfortunately this means no camelCasing, which cuts down on the readability of variable names. Maybe underscores are allowed?

Because my goal was to allow an arbitrary number of beforeAfter containers on a page, I’ve changed the jquery selectors in the script to look for divs of class “container”, rather than id “container”. I’ve always used id’s to single out individual design elements on a page, and classes for a class of elements. I could be wrong about this paradigm.

This html produces the following

Redundant image removed –see demo at top of this blog post, it’s a working example of the result of that container’s html.

Any beforeAfter settings not set by the user in the html will get the defaults. The “wipeto” point will be set to “50” (out of 100), the “beforetext” will be set to “Show only before”, etc.

Here’s the jquery code I use to iterate through each of the the divs of class “container” in the DOM, iterating through each div’s custom attributes to construct an object of options, and then calling the beforeAfter plugin on that div and passing it the set of user-set options:

<script type="text/javascript">
$(function(){
   $('div.container').each(function (index) {
      var $div = $(this);

      var userOptions = {};
      $.each(this.attributes, function(i, attrib) {
             if( /^data-/.test(attrib.name) ) {
              userOptions[attrib.name.replace(/data-/g, '')] = attrib.value;
              }
      });

// Adding just one more option to the object of arguments:                      
      userOptions['imagepath'] = '<?php echo WP_PLUGIN_URL . "/beforeafter/js/"; ?>';

      $div.beforeAfter(userOptions);
   });
});
</script>

This bit of script is in my wordpress plugin, with more comments, here: http://zachfine.com/blog/wp-content/plugins/beforeafter/beforeAfter-source.php

I made a few of changes to the jquery.beforeafter.js script to make use of the new “wipeto”, “beforetext”, and “aftertext” vars, and to remove camelCasing from the options/defaults vars to be consistent with the html5 custom attributes. My altered version is available here: http://zachfine.com/blog/wp-content/plugins/beforeafter/js/jquery.beforeafterZ.js
</email message>

I plan to use this plugin quite a bit in the near future. I hope you all enjoy using it as well. Thanks again to admin at catchmyfame.com for writing the original plugin and allowing me to distribute and use this modified version.

  1. Clicking rather than dragging the controls works just fine on iPhone/iPad. ↩︎
  2. Yes, I really did track a “power window” to the actress’s face, matte-ing a selective color adjustment, to restore/enhance the blue color of her eyes. Thanks for asking. ↩︎
  3. Yeah, the formatting doesn’t look so hot after it’s wrapped by your web browser, but you should have seen it before! The demo of the plugin at the top of this blog post can serve as a more readable example –see the html code of the post. ↩︎

Amazon’s selling the “Ultimate Ears SuperFi 4” earbuds for $40 for 1 day (deal now dead)

September 20th, 2010
Edit 9/21/2010: This deal now dead. They’re now selling on Amazon for $74.99.

Ultimate Ears SuperFi 4
Because I’ve bought or browsed similar items in the past, Amazon.com just sent me an email to let me know that the “Deal of the Day” is the Ultimate Ears SuperFi 4 Noise Isolating Earphones, which they’re selling today for $39.99. The email says this is 69% off the list price. I don’t know what Amazon’s regular price for these is as they’ve already changed their price for today’s deal, but I do know that these same earbuds go for $121.10 at buy.com, and they have sold for around $80 new on eBay 1. So this really is a significant price drop for what is normally an expensive item. 2

The market has gotten pretty crowded since I first started using high-quality earbuds, and this particular pair is one of many I’ve never tried, but the reviews for the SuperFi 4’s look to be promising. For half price or less they may be a good choice if you’ve been considering a set of better earbuds than those which come with the iPod/iPhone/Zune/etc.

I like and recommend using earbuds over headphones when monitoring audio recording in a noisy environment, when watching or listening to a media player on a plane or train, or when listening to media in bed 3. I’ve had very good experiences with Shure earbuds and with the Future Sonics Atrios. My Shure e2c’s I bought very cheaply on an earlier deal, and I use them for running 4. The Atrios are part of my production kit, and I also use them when traveling. The fact that earbuds block a lot of surrounding noise, just as do earplugs, allows me to concentrate on listening at lower volume and without distraction. If you’ve got the need, these might be worth looking into while they’re discounted. 5

  1. My favorite way to determine the going price for an item is to do a search on eBay for completed auctions. ↩︎
  2. The last sale a search turns up for this item was back in July for $59.99. ↩︎
  3. I’ve slept with earbuds in and iPhone alarm on before when traveling or when sharing a room to avoid waking others. ↩︎
  4. Which I really need to get back to doing on a regular basis. ↩︎
  5. Or as Amazon says, “…while supplies last.” ↩︎

My Steadicam Merlin recipe for Canon T2i with kit lens and Rode Videomic

August 18th, 2010
Canon T2i on Steadicam Merlin
Notice the pencils? They’re there to keep the Rode Videomic’s mount from doing its job. When the mic is semi-isolated from camera movement by its anti-shock mount, it wags from side to side, and has a very negative impact on camera balance. A pair of pencils tighten its suspension up just so. Click to enlarge photo.

A while back I posted a video of one of my more successful tests flying a Canon T2i DSLR on a Steadicam Merlin. In the Vimeo comment thread, people asked for my recipe 1, and I promised to post it. Time passed 2. I experimented with other, heavier lenses on my camera, and adjusted the Steadicam to each, erasing the previous settings.

The other day I ran second camera on a commercial shoot, needed to use the kit lens and Rode Videomic, and thus had to dig up my recipe. And there’s the recipe above, that image, taken with a cell phone camera. That’s pretty much all I recorded of my recipe, the rest is easy to derive from there. Here’s how I’ve got it set at the moment:

Img 0656
Another image of that seat-of-the-pants adaptation to steady the Rode Videomic’s shock mount. Click to enlarge photo.
  • Stage Mounting Hole: N
  • The stage mark is lined up right about at -1.25.
  • End Weights: 1 start, 2 full
  • Middle Weights: 1 full, 1 finish
  • Arc size: if “-” is -1 and “+” is 1, I’m set right around -0.15 –not sure if that’s the same setting as in the photo.
  • Gezornenplatz screw is in place, and the arc joint is locked. The setup works best when it is as stiff as possible.
Balance is everything on the Merlin, so any change to the weight or center of gravity of the stabilizer’s payload will make this recipe a starting point at best, if it’s of any use. Using a different lens, or zooming the kit lens from 18mm to 55mm would change the balance. If I were to configure the camera with anything other than a Canon T2i with the kit lens 3 and a Rode Videomic (don’t forget the pencils or pens), I’d probably recommend ignoring this recipe and starting from scratch.

I hope this information is of use to someone.

Neatvideo Test 6400Iso
On a semi-related note: I just ran the NeatVideo noise-reduction filter on that steadicam clip. To my eye, it once again did a nice job removing noise from video shot on the T2i at the 6400ISO setting. Click the thumbnail at right to see a large example frame.

Edit (2010/08/03): After a day using this reconstructed recipe and reviewing the resulting footage, it’s obviously more bottom heavy than the recipe with which I recorded that clip I’d posted to vimeo. Though this recipe balances the camera, there is sway when changing direction as a result of the bottom’s greater inertia. I think I’m going to try reducing the spar angle and lowering the gimbal so as to better equalize top and bottom. I want to get back to a 3-5 second drop time. 4

  1. A combination of steadicam weights and settings for a particular camera configuration and style of shooting is called a “recipe”, in the parlance of our times. ↩︎
  2. Sorry about that y’all. ↩︎
  3. A slow, but very lightweight and sharp 18-55mm lens, with Image Stabilization ↩︎
  4. Yep, I see that Garrett Brown, the inventor of the Steadicam Merlin, recommends a 1-second drop time in that video]. But I think I’ve gotten better results with a markedly less bottom-heavy setup, though it actually does make the device more difficult to balance at first. ↩︎

Oh plastic grapes, is there anything to which you can’t add a touch of class?

July 30th, 2010

Oh how the mighty have fallen…

July 24th, 2010